
A step by step guide on how to activate the Let’s encrypt certificate on a WordPress Blog which is hosted on all-inkl. You’ll need around 15-20 minutes to set everything up. Testing and debugging might take a bit longer (max. 1h).
Required components: WordPress, Hosting Company (like All-inkl.com)
Optional components: Own SSL certificate, FTP Client (e.g. FileZilla)
| # | Requirement | Importance |
| 1.0 | Purchase SSL Certificate | required |
| 2.0 | Change Website address in WordPress | required |
| 3.0 | Re-save permalinks | required |
| 4.0 | Rewrite internal linking | required |
| 5.0 | Avoid Redirect chains | recommended |
| 6.0 | Add new property in Google Search Console | recommended |
| 7.0 | Ensure that tracking works correctly | recommended |
| 8.0 | Testing and debugging | recommended |
Step 1: Get an SSL certificate
Purchase an SSL certificate (pricing differs, different certificates are available). A very simple SSL certificate is enough – Google does not make a difference between an expensive certificate and a cheap one (but the user might). Even a free certificate from “Let’s encrypt” would work and protect the site. Commercial websites still should purchase one since Let’s Encrypt is currently still in BETA.
If your hosting provider is “All-inkl”, you can just call their hotline and ask for activating SSL on your Domain. That should work with a few other hosting providers as well. For simplicity, here a step by step guide on how to activate the “Let’s Encrypt” certificate in the all-inkl.com dashboard (KAS):
- Go to https://kas.all-inkl.com
- Login with your KAS credentials
- Click on “Domain”
- Choose the Domain where you want to enable SSL and click on the icon on the right hand side:

- In the row “SSL Schutz” click on the Icon next to “bearbeiten”
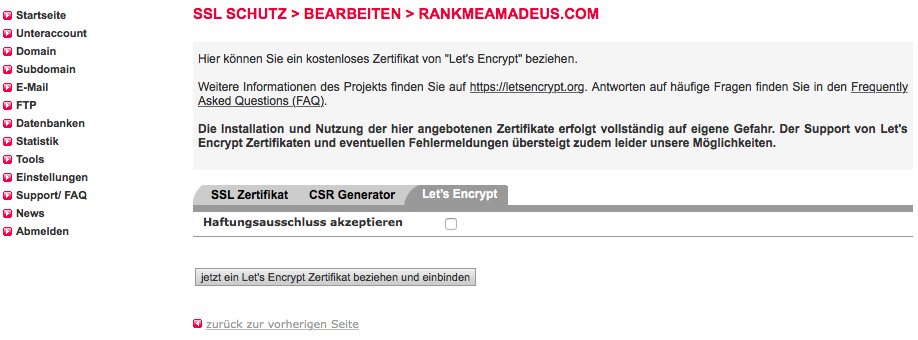
- In the tab click on “Let’s Encrypt”
- Tick the box “Haftungsausschluss akzeptieren”
- Finally click on “Jetzt ein Let’s encrypt Zertifikat beziehen und einbinden”
After a short period your website should be available under https://. You can now start to configure your Blog so that it is running completely under SSL.
Step 2: 301 Redirect the whole Blog
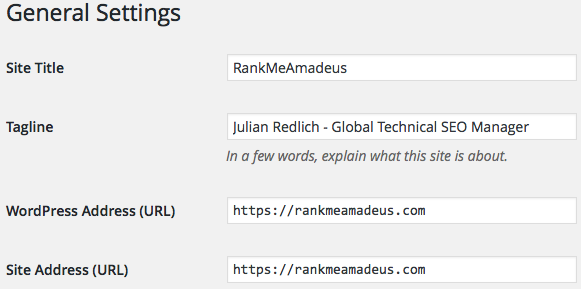
Change the WordPress and Site address in the WordPress backend fromm http:// to https://. This will add a rule into the .htaccess file which will 301 redirect any incoming traffic on http:// to the https:// equivalent. Please perform a backup of your MySQL database and WordPress installation BEFORE you make any changes. Changing these addresses can make the website AND installation unreachable.
You’ll find these settings under Settings > General
If the website is unreachable after this change, you can recover everything while going to your PHPmyAdmin console and change the values manually back to the http:// version.
Step 3: Re-Save your Permalink structure
If the change was successful and the website is now reachable under the SSL version, re-save your permalink structure.
NOTE: This will just work if your .htaccess file is writable. If it is not writable, you can change it’s permissions via an FTP-Client (like FileZilla) or upload the changes manually via FTP (Code will be provided under the save button).
You’ll find the “save button” under Settings > Permalinks
![]()
Step 4: Check internal linking
Now you need to check whether your internal linking works properly. Therefore you can click on the menu items and see whether they are running under http or https – same goes for links from blog posts.
I recommend to perform a website crawl to filter down, which URLs are still running under http.
NOTE: Just because the links might redirect now correctly doesn’t mean that everything is correct. Internal links should always link directly and the linked page should respond with a Status code 200. If it redirects via 301 status code, you might need to change some of the links manually.

The text above contains an internal link in the 1st line which points to the http version of the website. This should get changed into https:// if not done automatically.
I count under the category “internal linking” also any file or attachment of the website. Make sure that every picture which is currently implemented get’s replaced by the same picture running under HTTPS.
NOTE: If files on the website point to unsecure HTTP, the browser will not present a secure lock sign in the address-bar:
![]()
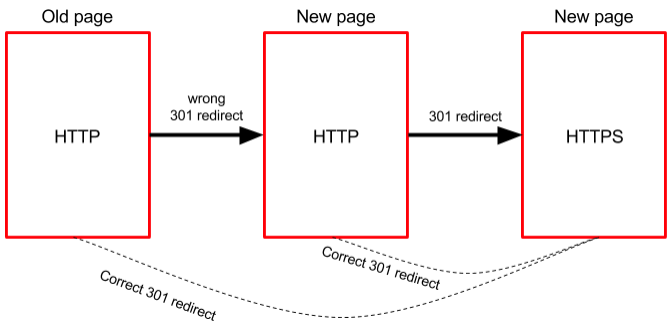
Step 5: Avoid redirect chains
Redirects which were done in the past might redirect a http page to another http page. Since the new page will run under https, it might lead to redirect chains. Google will waste crawl budget on redirect chains which we want to avoid:

Step 6: Create new property in the Search Console
As soon as everything is setup and working correctly, create a new property in the Search Console with the following versions:
https://www.domain.com
https://domain.com
As soon as the new properties are confirmed and verified, change the settings of “prefered Domain” into https.
NOTE: To make this changes, the account need to be set up as “Owner” of the property. Full permission as a user will not be enough.
Step 7: Ensure that tracking is still working correctly
Please make sure that your tracking is still working correctly under https. There might be a drop in visitors if not done correctly from the beginning.
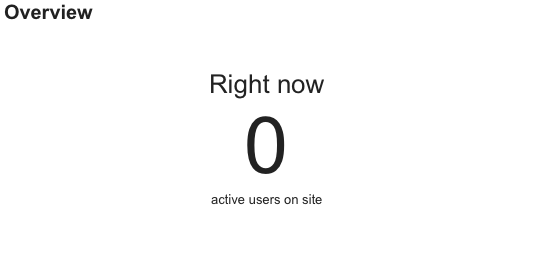
Go to Google Analytics (or your preferred tracking tool) and click on “Real time”. If the number of users are on 0 even after reloading the domain under https, Google Analytics does not work correctly. This might be due to Google Tag Manager (if you use it) which does not fire the tag correctly anymore. To test, whether GTM fires the tag, open GTM and click on preview. Then reload the site and check the information box.
Step 8: Testing and debugging
If something got broken during the process, please test whether the following parts are setup correctly.
NOTE: Make sure that you do not test on a cached website.
- CSS & JS files contain https
- The canonical tag points to the new https version
- All old HTTP files redirect correctly to the new HTTPS equivalent
- Images and other files are running under HTTPS
Useful tools to test if everything worked out correctly:
Scraming Frog: Check for 301 and 404 status codes after performing the crawl. That will help you to understand what went wrong during the process.
WhyNoPadlock: Getting a broken certificate error? Find out what happened: https://www.whynopadlock.com
Your feedback is welcome! Please leave a comment or write me an E-Mail where I can improve the guide.
Turns out I had to go into my MaxCDN account, go to my Pull Zones, edit my zone, go to the SSL tab, then Shared SSL, then Enable. After that, I had to go to my W3 Total Cache plugin settings in wordpress, go to CDN settings, and paste the URL that MaxCDN gives you as the “SSL” CDN URL.